Curvenote allows you to easily publish content on the web as a fast, optimized site that preserves all interactive features in Curvenote, and can be hosted for free on a *.curve.space domain or on your own custom domain.
In this tutorial we will:
- pull content from an existing project on curvenote.com;
- edit the files locally seeing live updates; and
- deploy that to a new website hosted at
https://username.curve.space.
Create a folder and execute curvenote init
In this tutorial we will create a scientific website by pulling content locally, where you can customize features or edit content with live-reloads in a local web-server, and then deploy the site directly from your computer.
🛠 The first step is to create a new directory that will contain all local files for your site:
mkdir myproject
cd myproject
🛠️ Next, call curvenote init to start an interactive command line that will guide you through the initial setup of your site.
% curvenote init

Welcome to the Curvenote CLI!! 👋

curvenote init walks you through creating a curvenote.yml file.

You can use this client library to:

 - sync content to & from Curvenote
 - build & export professional PDFs
 - create a local website & deploy to https://your.curve.space

Find out more here:
https://curvenote.com/docs/cli


? What is the title of this project? (My Project)
The title of your project/site will appear in web-browser tabs, metadata, and navigation menus. This title, and any other setting, can be modified later by editing the curvenote.yml file produced in this step.
Using existing content from Curvenote
Next, we will choose content to add to our site. In this tutorial, we will start with an existing Curvenote project. To create your own project, you can go through the documentation on writing in Curvenote, the tutorial continues using a default project.
🛠️ Choose Import from Curvenote
? What content would you like to use? (Use arrow keys)
❯ Import from Curvenote
  - Use the content & notebooks in this folder
If you are using your own content, navigate to your project in Curvenote and copy and paste a link to your project, or any article or notebooks within it. The default project shows features like references, callouts, cross-references, and interactive Jupyter Notebooks.
🛠️ Press enter to select the default project.
? Link to Curvenote project: (https://curvenote.com/@templates/web) The CLI will validate the link and ask you to confirm a location to store content locally, relative to your current folder — as you’re getting started just accept the default here.
Validating link...
🚀 Found "Project Templates" (@templates/web)
? Name of local folder to sync to? (content/web) Start the local website
Next you will be asked if you want to start the local web server.
Curvenote setup is complete!! 🚀

You can use this client library to:

  - curvenote pull: Update your content to what is on https://curvenote.com
  - curvenote start: Start a local web server now!
  - curvenote deploy: Share content on https://your.curve.space

Find out more here:
https://curvenote.com/docs/cli


? Would you like to start a local server now? (Y/n)
🛠️ Choose to start the web server the press y or Enter. This will trigger the following actions:
- ⬇️ finish pulling content from your project to local
.mdand.ipynbfiles - 🕸 clone a copy of the
curvenoteon your machine - 🧱 install libraries and dependencies
- 🏗️ build the
mdandipynbcontent into staticjsonfor deployment - 🚀 start a local web server on http://localhost:3000 or another port if that one is busy
Visit http://localhost:3000 to see the local site. If you leave the command line running in your terminal it will watch for changes to local files and automatically update. This allows you to see changes immediately as you make local edits and change configuration settings.
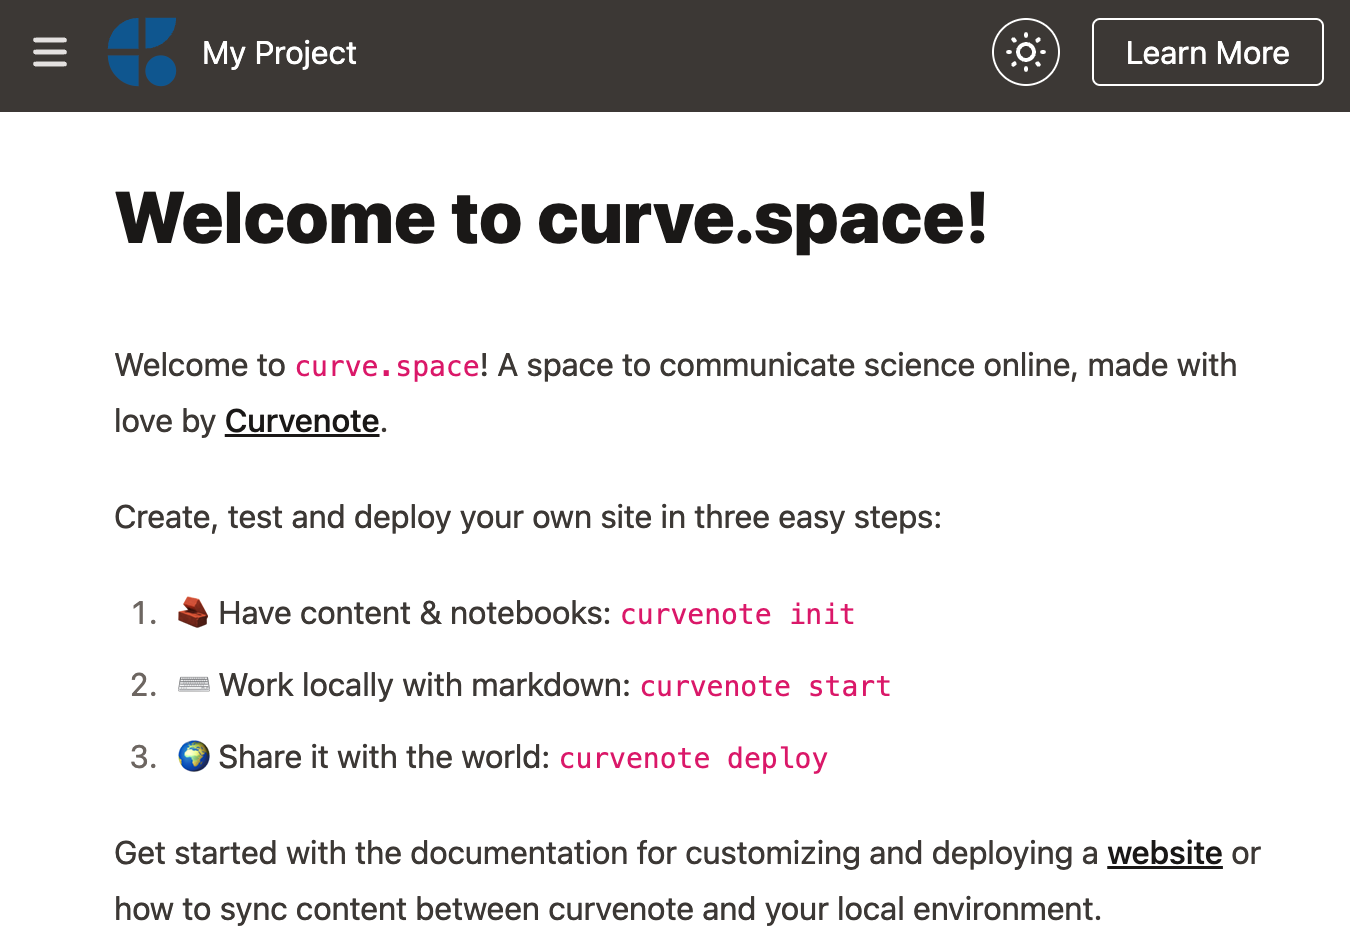
If you are following with the defaults your website should look something like Figure 1, as well as including interactive figures, references, citations, and Jupyter Notebooks.

Using the default project should bring up a site in your browser that looks something like this figure!
Folders & files created
🛠️ Open the folder in a text editor program, like VSCode, to explore the structure of the project.
There are a few things to notice including the configuration YAML and folders for content, _build and public information for your site.
First, the curvenote.yml contains all of the information for your site like the title, navigation, logo and any actions in the navigation. The configuration also includes configuration about the project, which is different because you can actually have many projects in a single site (e.g. many presentations or papers that live on your website). The project in this file is the main project for the site and will contain the index material or landing pages. If you started with a paper or report instead, you can always import this into a different site in the future.
Second, the content folder includes all of the Markdown files and Jupyter Notebooks in your project. We will look at these files more in the next section as we make a few changes. The individual content folder has a references.bib for the project (see Citations), and also includes an images folder that has all images necessary for the markdown and notebook files.
The public folder contains additional static assets necessary for your site like logos, favicons, or global files to download. The public folder doesn’t contain images for your articles or notebooks, which are kept in the content folder.
The _build/web folder contains all of the information for running the local web server as well as listen to changes when you are editing the site to provide incremental updates.
Making changes
There are three major areas of the site that we can change (1) the content in Markdown or Notebooks; (2) the table of contents and navigation (including actions); (3) the branding and theme. We will focus in this tutorial on editing content, and you can explore more in guides for Table of Contents, Navigation & Actions, Logo & Branding, and in Themes.
🛠️ For the live editing to work, ensure that the web server is running, if you have cancelled it you can bring it back up using curvenote start
Editing Markdown
🛠️ Open content/web/index.md
You will see markdown frontmatter surrounded in --- where we can set the title of the article.
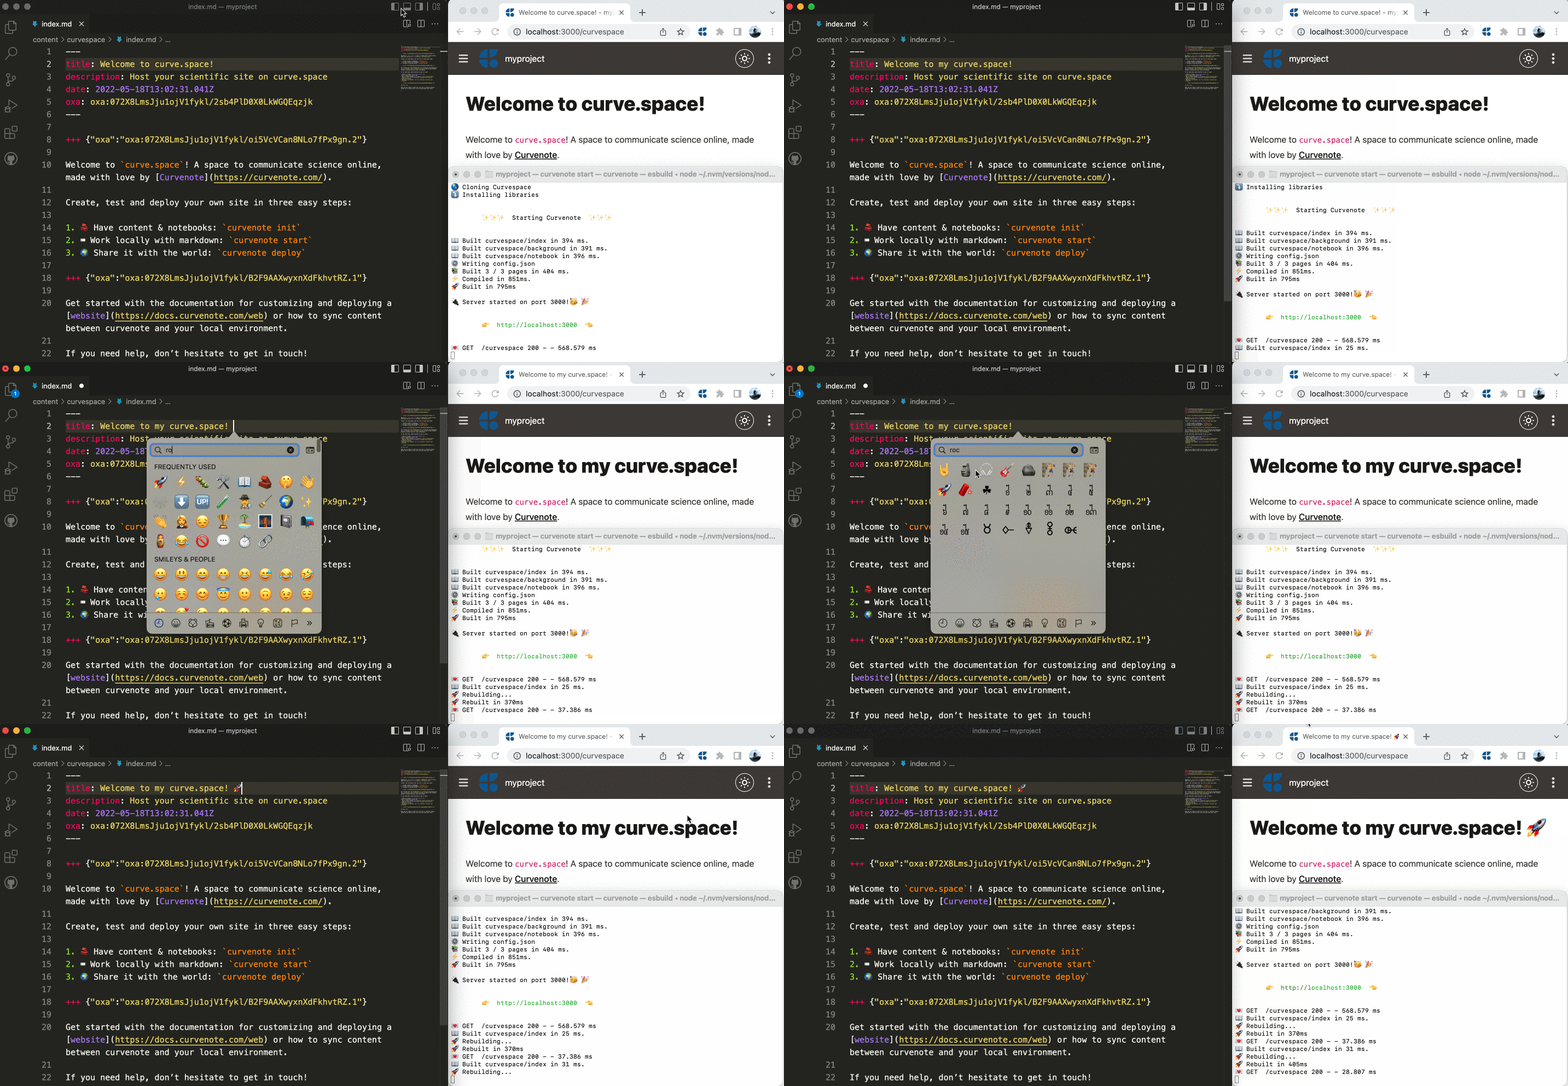
🛠️ Change the title of the index file to Welcome to my site 🚀 and save the file.
The site will live-reload in a few milliseconds (without loosing your scroll position!). If you have the server open (the bottom-right pane in Figure 2) then you can also see the updates to the web server. In this case the file was built in 25ms ⚡.

Live-reload of changes to title and content showing an editor in VSCode on the left and the curve.space site on the top-right with the curvenote start command in the bottom-right.
🛠️ Change some of the text and see the changes in real time. You can use standard markdown or extended syntax for MyST markdown.
There are a few other additions to the flavour of markdown, called MyST, that we use to allow for rich scientific writing. You will also notice the OXA Links, which allow us to sync information to/from Curvenote blocks. For more information, see the guide on working with markdown.
Editing Notebooks
Jupyter Notebooks are an excellent way to explore, visualize and analyze scientific data. Curvenote has first-class support for Jupyter, including interactive visualizations (see the Jupyter docs for more).
🛠️ Open the notebook content/web/notebook.md using VSCode, Jupyter Lab or the classic Jupyter Notebook app.
You can make any edits locally as you normally would.
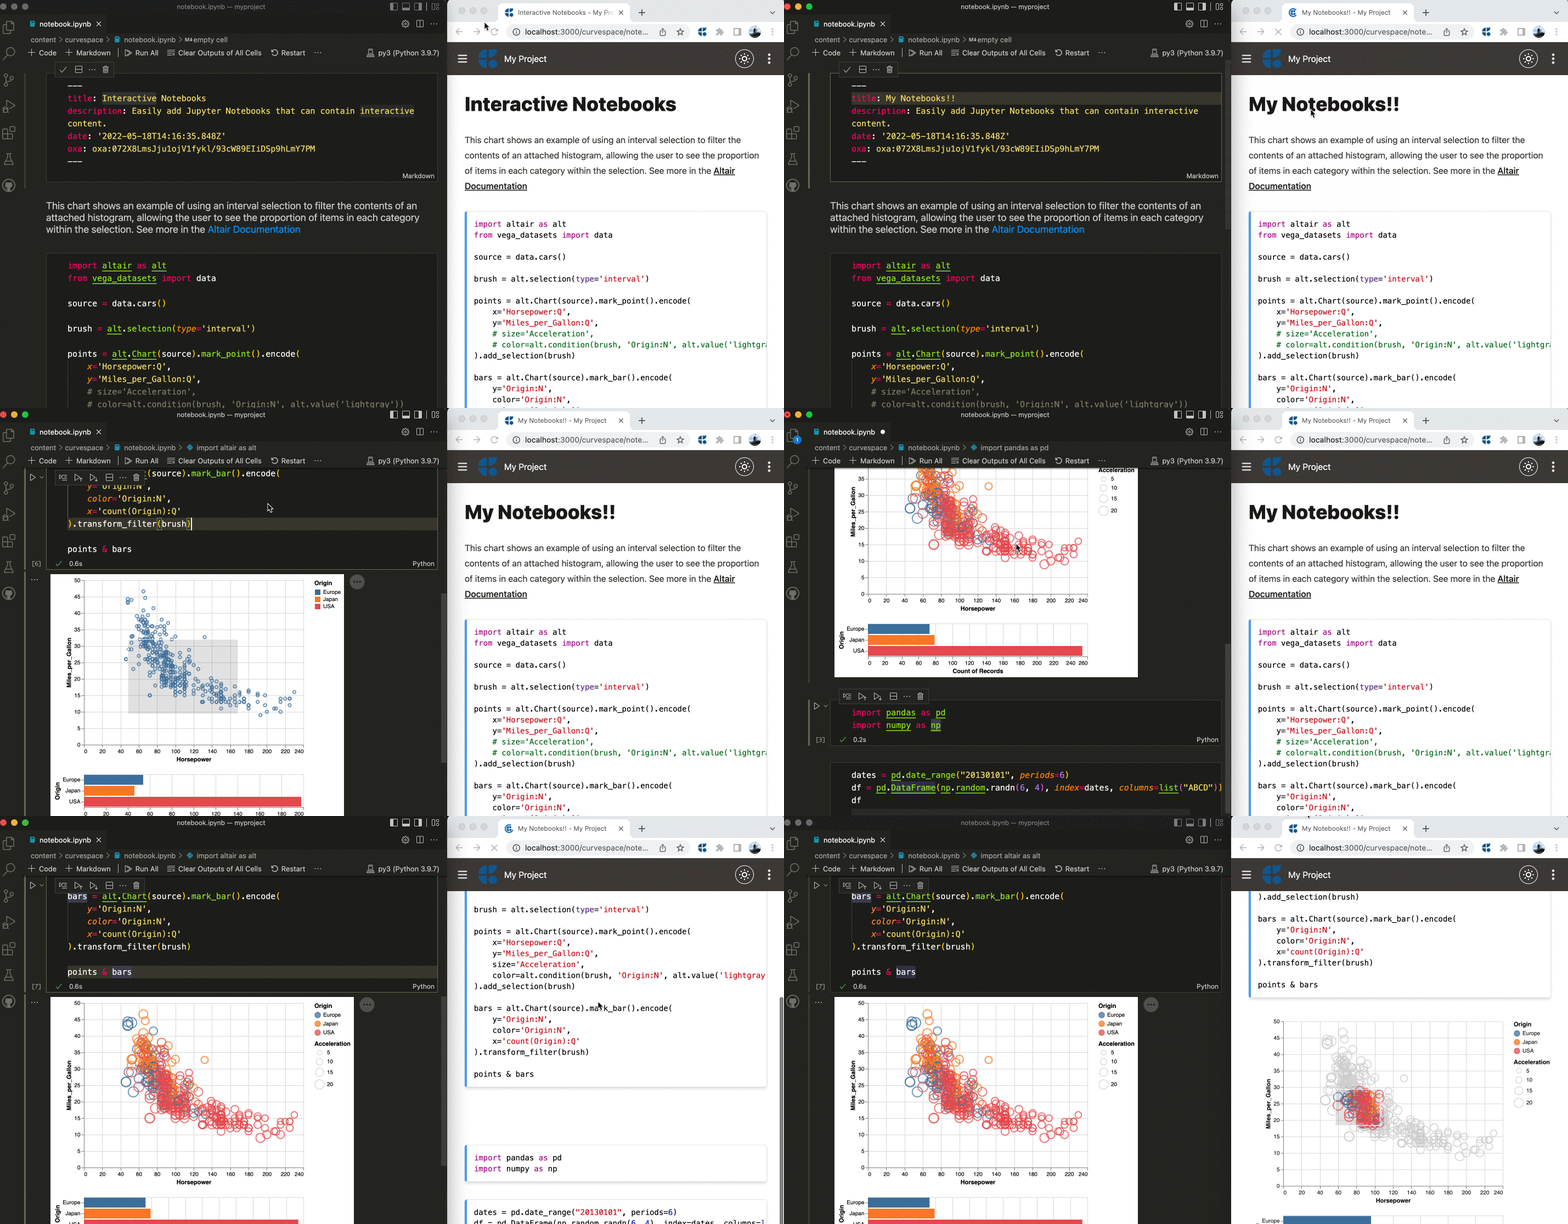
🛠️ Edit the frontmatter, which is a markdown cell, and see the site update in real time.
Many of the interactive visualizations in Jupyter work out of the box in a curve.space site, in the default project in Figure 3 you can see an you can see an Altair plot being updated and reloaded in real-time.

Live reload of notebooks with interactive visualizations like Altair plots.
The markdown cells in your notebook can also have rich MyST markdown content, including citations and references to figures. For more information, see the guide on working with notebooks.
Deployment
Up until now, all of our site and changes have been local, next we are going to deploy our site to the internet so other people can see the interactive notebooks and reports we have made.
🛠️ To deploy, stop the local web server using ctrl+c then run curvenote deploy.
% curvenote deploy

? Deploy local content to "https://your.curve.space"? (y/N)
You’ll be shown the target URL for your site, which is based on your Curvenote username and the site.domains list in your curvenote.yml.
🛠️ Type Y or Enter to confirm the deployment, and your site will be uploaded and available in the next few seconds. 🚀
☁️ Uploading 27 files
 ████████████████████████████████████████ 100% | ETA: 0s | 27/27
☁️ Uploaded 27 files in 3.64 s.
🚀 Deployed 27 files in 2.08 s.
🕸 Site Deployed
🌎 https://your.curve.space
🎉 Congrats on deploying your first site! The site is wicked-fast, follows best practices for performance, accessibility, citations, metadata, SEO, and has a full API on all of the content to help make it FAIR Wilkinson , 2016. You can use this to help share your scientific work and the data and computations behind it.
Next steps
So far you’ve deployed your content, with default settings and without additional configuration — find out how to customize your site by understanding the Local Folder Structure and checking the Configuration options.
- Wilkinson, M. D., Dumontier, M., Aalbersberg, Ij. J., Appleton, G., Axton, M., Baak, A., Blomberg, N., Boiten, J.-W., da Silva Santos, L. B., Bourne, P. E., Bouwman, J., Brookes, A. J., Clark, T., Crosas, M., Dillo, I., Dumon, O., Edmunds, S., Evelo, C. T., Finkers, R., … Mons, B. (2016). The FAIR Guiding Principles for scientific data management and stewardship. Scientific Data, 3(1). 10.1038/sdata.2016.18